
前回は開発環境の構築を行いました.
WP7605は通信モジュールなのでHTTPサーバとして
動かしてみようと思います.
構成
Sierra Wireless社のLegatoフレームワークにもlighttpdを使用した
サンプルアプリケーションが存在します.
しかし今回はWP7605を通常のLinuxマシンのように使用する前提で
別途lighttpdをビルドしサーバとして運用することにします.
以前MicroBlazeで使用したのを参考にビルドしていきます.
ビルド
ディレクトリ構成はホームディレクトリ以下にhttpsvディレクトリを作成し
その下に様々作成する予定です.
ターミナルを開いたら以下のコマンドを実行してからビルドを始めます.
. /opt/swi/SWI9X07Y_02.28.03.05/environment-setup-armv7a-neon-poky-linux-gnueabi

mkdir httpsv
cd httpsv
pcre
それではまずlighttpdをビルドするのに必要なライブラリをビルドします.
cd ~/httpsv
wget https://ftp.pcre.org/pub/pcre/pcre-8.44.zip
unzip pcre-8.44.zip
cd pcre-8.44
mkdir build
./configure --host=arm-poky-linux-gnueabi --prefix=`pwd`/build/
make
make install
lighttpd
次にlighttpd本体をビルドします.
WP7605ではビルドしたlighttpdを単体で動作させる予定なので
ライブラリは基本的に静的リンクとします.
cd ~/httpsv
wget https://download.lighttpd.net/lighttpd/releases-1.4.x/lighttpd-1.4.59.tar.gz
tar -xvf lighttpd-1.4.59.tar.gz
cd lighttpd-1.4.59
mkdir dest
LIGHTTPD_STATIC=yes CPPFLAGS=-DLIGHTTPD_STATIC PCRECONFIG=`pwd`/../pcre-8.44/build/bin/pcre-config PCRE_LIB=`pwd`/../pcre-8.44/build/lib/libpcre.a ./configure --host=arm-poky-linux-gnueabi --prefix=`pwd`/dest --enable-static=yes --enable-shared=no
静的リンクするためには別途ヘッダーファイルを作成しなければいけないので
“~/httpsv/lighttpd-1.4.59/src/plugin-static.h”として以下の内容で作成します.
PLUGIN_INIT(mod_access)
PLUGIN_INIT(mod_accesslog)
PLUGIN_INIT(mod_auth)
PLUGIN_INIT(mod_redirect)
PLUGIN_INIT(mod_rewrite)
PLUGIN_INIT(mod_cgi)
PLUGIN_INIT(mod_fastcgi)
PLUGIN_INIT(mod_scgi)
PLUGIN_INIT(mod_ssi)
PLUGIN_INIT(mod_proxy)
PLUGIN_INIT(mod_indexfile)
PLUGIN_INIT(mod_dirlisting)
PLUGIN_INIT(mod_staticfile)
作成したらビルドを続けます.
make
make install
これでlighttpdのビルドが完了しました.
lighttpdを動かす準備
lighttpdを動かすために準備を行います.
デプロイする際にわかりやすいように転送するためのディレクトリを作成しlighttpdをコピーします.
mkdir ~/httpsv/httpsv_root/ ~/httpsv/httpsv_root/log ~/httpsv/httpsv_root/www
cp ~/httpsv/lighttpd-1.4.59/dest/sbin/lighttpd ~/httpsv/httpsv_root/
lighttpdは設定ファイルが必要です.
設定ファイルのサンプルはlighttpdのソースコードディレクトリ以下doc内にあります.
今回は複数ファイルに分散していると少し面倒に感じてしまったので単一ファイルに統一します.
(mimeの設定だけ大きいので別ファイルとする)
“~/httpsv/httpsv_root/lighttpd.conf”
var.server_root = "/home/root/httpsv_root"
var.log_root    = server_root + "/log"
var.state_dir   = "/run"
var.home_dir    = server_root
var.conf_dir    = "/etc/lighttpd"
var.modules_dir = server_root
var.vhosts_dir  = server_root + "/www"
var.cache_dir   = "/var/cache/lighttpd"
var.socket_dir  = server_dir + "/sockets"

#modules
server.modules = (
  "mod_access",
  "mod_cgi"
)

cgi.assign = (
  ".pl" => "/usr/bin/perl",
  ".cgi" => "/usr/bin/perl",
  ".py" => "/usr/bin/python",
  ".sh" => "/bin/sh"
)

server.port = 80
server.use-ipv6 = "enable"

server.bind="[::]"
$SERVER["socket"] == "0.0.0.0:80" {
}

server.document-root = server_root + "/www"
server.pid-file = state_dir + "/lighttpd.pid"

server.errorlog             = log_root + "/error.log"
server.upload-dirs = (log_root)

server.network-backend = "sendfile"
server.max-fds = 2048
server.stat-cache-engine = "simple"
server.max-connections = 1024

index-file.names += (
  "index.xhtml", "index.html", "index.htm", "default.htm", "index.php"
)

url.access-deny             = ( "~", ".inc" )

static-file.exclude-extensions = ( ".php", ".pl", ".fcgi", ".scgi" )
include var.server_root + "/mime.conf"
mime.confはdocからコピーします.
cp ~/httpsv/lighttpd-1.4.59/doc/config/conf.d/mime.conf ~/httpsv/httpsv_root/コンテンツの作成
次はHTTPサーバで表示するコンテンツを作成します.
単純なHTMLファイルを表示するだけでは面白くないので
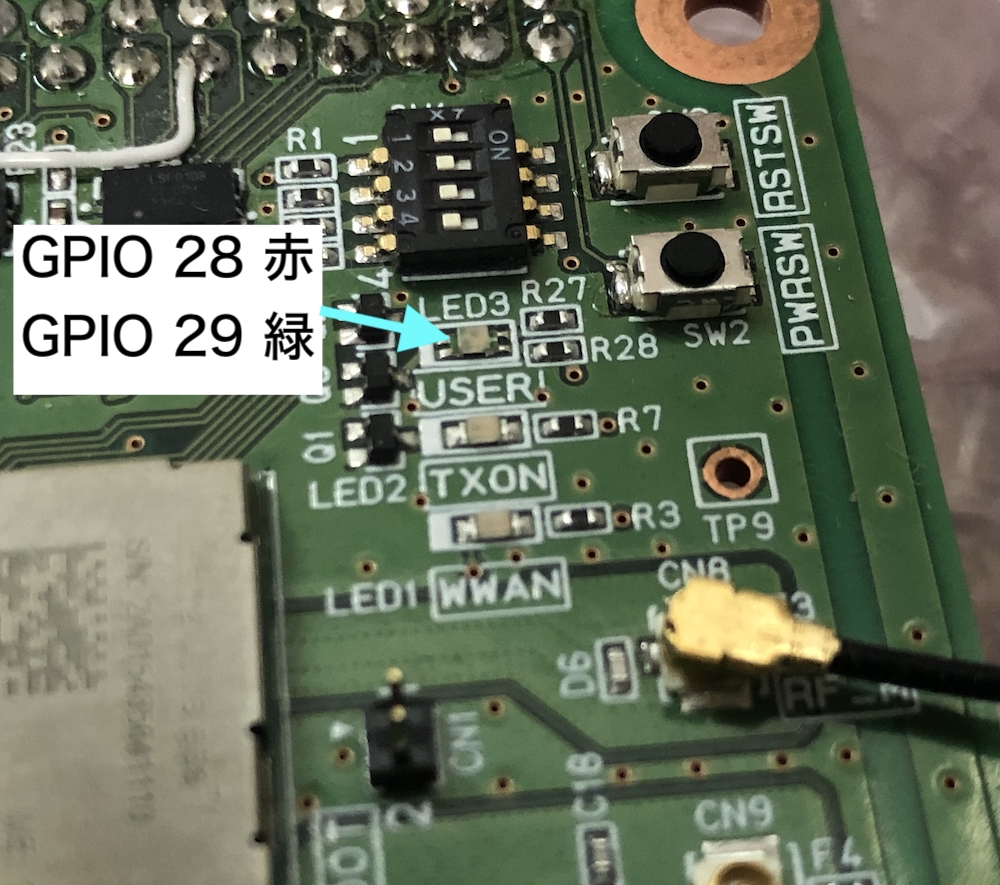
モジュールに搭載されているLEDの制御をしてみようと思います.
GPIOの制御はLinuxの仮想ファイルシステムを経由する方法で行います.
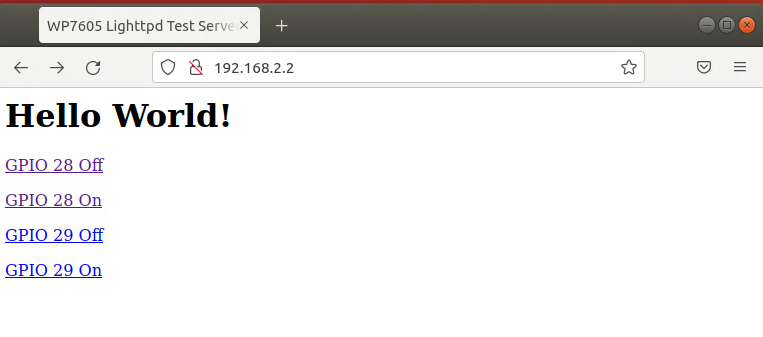
“~/httpsv/httpsv_root/www/index.html”
<head>
	<title>WP7605 Lighttpd Test Server</title>
</head>
<body>
	<h1>Hello World!</h1>
	<p><a href="gpio.py?port=28&value=0">GPIO 28 Off</a></p>
	<p><a href="gpio.py?port=28&value=1">GPIO 28 On</a></p>
	<p><a href="gpio.py?port=29&value=0">GPIO 29 Off</a></p>
	<p><a href="gpio.py?port=29&value=1">GPIO 29 On</a></p>
</body>
“~/httpsv/httpsv_root/www/gpio.py”
#!/usr/bin/python
# -*- coding: utf-8 -*-

import os
import re

#https://github.com/legatoproject/legato-af/blob/master/apps/sample/httpServer/pages/utils.py
def decode_params(querystr):
    if querystr is None:
        return {}

    queries = querystr.split('&')
    params = {}
    for x in [z.split("=") for z in queries]:
        if len(x) == 2:
            params[urldecode(x[0])] = urldecode(x[1])

    return params

def urldecode(s):
    return unquote(s.replace('+',' '))

def unquote(url):
    return re.compile('%([0-9a-fA-F]{2})',re.M).sub(lambda m: chr(int(m.group(1),16)), url)

def main():
  port = "-1"
  value = "-1"

  print "Content-Type: text/html\n"
  print "Hello python world
\n"

  if os.environ.get("REQUEST_METHOD") == 'GET' and 'QUERY_STRING' in os.environ:
    dct = decode_params(os.environ['QUERY_STRING'])
  else:
    dct={}

  if dct.has_key("port"):
    port=dct["port"]

  if dct.has_key("value"):
    value=dct["value"]

  print "port " + port + "
value " + value + "
\n"

  if 28 <= int(port) and int(port) <= 29 and 0 <= int(value) and int(value) <= 1:
    if not os.path.exists("/sys/class/gpio/gpio"+port) :
      with open("/sys/class/gpio/export", "w") as f:
        print >> f, port

    with open("/sys/class/gpio/gpio" + port + "/direction", "w") as f:
      print >> f, 'out'
    with open("/sys/class/gpio/gpio" + port + "/value", "w") as f:
      print >> f, value
    print "
done"
  else:
    print "
port or value error"

if __name__ == '__main__':
    main()
いざデプロイ
WP7605上で実際に動かします.
WP7605を開発用PCに接続し,電源を入れます.
そして先ほど作成したhttpsv_rootディレクトリを転送します.
scp -r ~/httpsv/httpsv_root root@192.168.2.2:~/次からはWP7605上で操作するためsshで接続しlighttpdを起動します.
ssh root@192.168.2.2
cd ~/httpsv_root
./lighttpd -f lighttpd.conf
これでHTTPサーバは動き始めましたが,そのままではポートが開放されていないので
外部からアクセスできません.
以下のコマンドでIPv4及びIPv6の両方のポートを開放します.
iptables -A INPUT -p tcp --dport 80   -j ACCEPT
ip6tables -A INPUT -p tcp --dport 80   -j ACCEPT
開発用PCからは192.168.2.2でブラウザからアクセスすればHTMLファイルが表示されます.
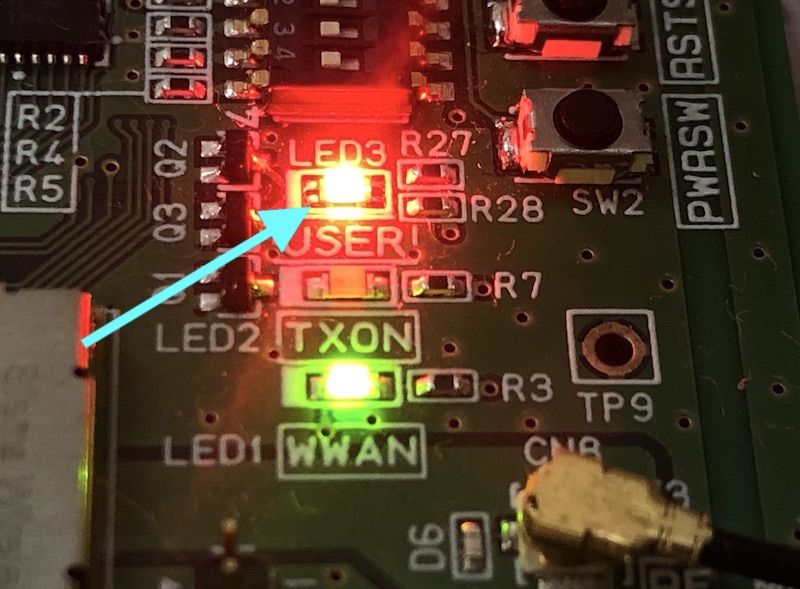
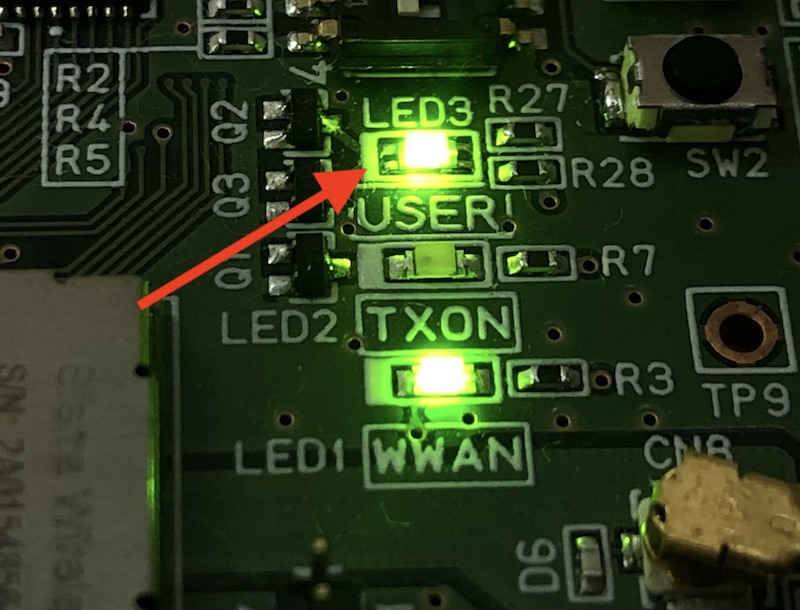
それぞれのリンクへ遷移すれば対応するLEDが点灯消灯することが確認できます.

現状ではローカルでの接続であるため,本来のキャリア回線経由でのアクセスも試します.
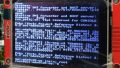
まずはWP7605からキャリア回線へ接続します.
# cm data connect &
Setting up profile 1
Connecting ... ok
Checking if device 'rmnet_data0' is up ... ok
Routing inet ... ok
mv: can't remove '/etc/resolv.conf': Device or resource busy
Updating /etc/resolv.conf ... ok
Updating /etc/resolv.conf ... ok
Routing inet6 ... ok
mv: can't remove '/etc/resolv.conf': Device or resource busy
Testing connection ...
Testing connection …と表示されればキャリア回線へ接続されたようです.
IPアドレスを確認し別のPCやスマートフォンからアクセスします.
# ip a
1: lo: <LOOPBACK,UP,LOWER_UP> mtu 65536 qdisc noqueue state UNKNOWN group default
~~~
4: rmnet0: <UP,LOWER_UP> mtu 2000 qdisc pfifo_fast state UNKNOWN group default qlen 1000
    link/[530]
5: rmnet_data0: <UP,LOWER_UP> mtu 1500 qdisc pfifo_fast state UNKNOWN group default qlen 1000
    link/[530]
    inet 100.xxx.xxx.xxx/30 scope global rmnet_data0
       valid_lft forever preferred_lft forever
    inet6 2001:xxxx:yyyy:zzzz:aaaa:bbbb:cccc:dddd/64 scope global
       valid_lft forever preferred_lft forever
    inet6 fe80::xxxx:xxxx:xxxx:xxxx/64 scope link
       valid_lft forever preferred_lft forever
6: rmnet_data1: <> mtu 1500 qdisc noop state DOWN group default qlen 1000
~~~
回線の契約にもよりますが今回はIPv6のみ外部からアクセス可能なものとなっているので
IPv6のアドレスを使用します.http://[2001:xxxx:yyyy:zzzz:aaaa:bbbb:cccc:dddd]/
IPv6はアドレスに対してスクエアブラケット[]で囲んだものをブラウザに入力します.
ローカルと同様に制御できました.
まとめ
WP7605はLinuxが内部で動いているので通常のマシンのように
HTTPサーバを動作させることができました.
今回はGPIOの制御をキャリア回線経由で制御することができました.
電源を確保し電波がつながる範囲であれば制御できるのでGPIOだけでなく
他のインタフェースも使用して様々な応用が考えられます.
コメント